
Creating Our First Tenant With Hyn Tenancy 5.4
This article is a continuation of Creating a Laravel SaaS Framework .
Now that we have the basic setup, let’s create our first tenants! We’ll initially do this through an artisan command. This is based on the article by Ashok Gelal, with some updates for the latest versions.
1. Configuration Updates
We’ll start off by making some configuration updates so that we can separate our tenants by subdomains. First, open up the .env file and add in a value for APP_URL_BASE and also make a slight modification to APP_URL. For my case, I’m still developing on localhost, so that’s what I’ll use.
.env
APP_URL_BASE=localhost
APP_URL=http://${APP_URL_BASE}
Secondly, let’s add a new setting in our app.php config file. Find the “Application URL” section and add in our new ‘url_base’ setting.
config/app.php
    /*
    |--------------------------------------------------------------------------
    | Application URL
    |--------------------------------------------------------------------------
    |
    | This URL is used by the console to properly generate URLs when using
    | the Artisan command line tool. You should set this to the root of
    | your application so that it is used when running Artisan tasks.
    |
    */

    'url_base' => env('APP_URL_BASE', 'http://localhost'),

    'url' => env('APP_URL', 'http://localhost'),

    'asset_url' => env('ASSET_URL', null),
After that’s set up, we’ll clear our application’s cache.
$ php artisan config:cache

Configuration cache cleared!
Configuration cached successfully!
That should do it for our new configuration. Let’s move on to creating our first tenant.
2. Create a Tenant
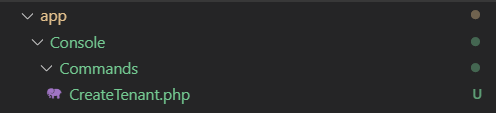
$ php artisan make:command CreateTenantYou should now have a CreateTenant file under app/Console/Commands.
Open up the CreateTenant.php file and make some modifications to create the actual tenant. First, let’s give the command the variables it’s going to need to create the tenant. Edit the $signature line to include subdomain, name and email. Also, give the command a description.
app/Console/Commands/CreateTenant.php
    /**
     * The name and signature of the console command.
     *
     * @var string
     */
    protected $signature = 'tenant:create {subdomain} {name} {email}';

    /**
     * The console command description.
     *
     * @var string
     */
    protected $description = 'Creates a Tenant with a subdomain, name and email. Example: php artisan tenant:create test "Test User" #ob#grfg#at#rknzcyr.pbz#ob#';
Now we’ll create the handle() function that handles the actual creation of the tenant. Add in the required Hyn\Tenancy dependencies and set up the functions as shown in the code below. Notice that we’re doing a quick check to make sure that the tenant doesn’t already exist before creating one.
app/Console/Commands/CreateTenant.php
<?php

namespace App\Console\Commands;

use Hyn\Tenancy\Contracts\Repositories\HostnameRepository;
use Hyn\Tenancy\Contracts\Repositories\WebsiteRepository;
use Hyn\Tenancy\Environment;
use Hyn\Tenancy\Models\Hostname;
use Hyn\Tenancy\Models\Website;

use App\User;
use Illuminate\Console\Command;
use Illuminate\Support\Facades\Hash;

class CreateTenant extends Command
{
    /**
     * The name and signature of the console command.
     *
     * @var string
     */
    protected $signature = 'tenant:create {subdomain} {name} {email}';

    /**
     * The console command description.
     *
     * @var string
     */
    protected $description = 'Creates a Tenant with a subdomain, name and email. Example: php artisan tenant:create test "Test User" #ob#grfg#at#rknzcyr.pbz#ob#';

    /**
     * Create a new command instance.
     *
     * @return void
     */
    public function __construct()
    {
        parent::__construct();
    }

    /**
     * Execute the console command.
     *
     * @return mixed
     */
    public function handle()
    {
        $url_base = config('app.url_base');
        $subdomain = $this->argument('subdomain');
        $name = $this->argument('name');
        $email = $this->argument('email');
        $fqdn = "{$subdomain}.{$url_base}";

        // first check to make sure the tenant doesn't already exist
        if ( $this->tenantExists( $fqdn ) ) {
            // abort with an error
            $this->error( "A tenant with the subdomain '{$subdomain}' already exists." );
            return;
        }

        // if the tenant doesn't exist, we'll use the Tenancy package commands to create one
        $hostname = $this->createTenant( $fqdn );

        // swap the environment over to the hostname
        app( Environment::class )->hostname( $hostname );


        // create a new user
        $password = str_random();
        $user = User::create([
            'name' => $name,
            'email' => $email,
            'password' => Hash::make( $password )
        ]);

        // return a success message to the console
        $this->info( "Tenant '{$name}' created for {$fqdn}");
        $this->info( "The user '{$email}' can log in with password {$password}");
    }

    private function tenantExists( $fqdn ) {
        // check to see if any Hostnames in the database have the same fqdn
        return Hostname::where( 'fqdn', $fqdn )->exists();
    }

    private function createTenant( $fqdn )
    {
        // first create the 'website'
        $website = new Website;
        app( WebsiteRepository::class )->create( $website );

        // now associate the 'website' with a hostname
        $hostname = new Hostname;
        $hostname->fqdn = $fqdn;
        app( HostnameRepository::class )->attach( $hostname, $website );

        return $hostname;
    }
}
Ideally we’ll want an email that goes out as well to notify about this creation, but more on that later. Right now, let’s run the command and see what happens.
$ php artisan tenant:create foo "Billy Bob" #ob#ovyyl#at#rknzcyr.pbz#ob#

Tenant 'Billy Bob' created for foo.localhost
A user '#ob#ovyyl#at#rknzcyr.pbz#ob#' can log in with password qV3MEHs84vSRiLSR
Perfect! Now let’s see what happens if we run it again.
$ php artisan tenant:create foo "Billy Bob" #ob#ovyyl#at#rknzcyr.pbz#ob#

A tenant with the subdomain 'foo' already exists.
Exactly what we wanted. Make sure to copy the password created here to test logging in.
2. Checking Our Setup
So, that was fun and all… but what exactly have we accomplished so far? Do we have a fully functioning SaaS setup yet? Far.. Far from it.
Well, what do we have?
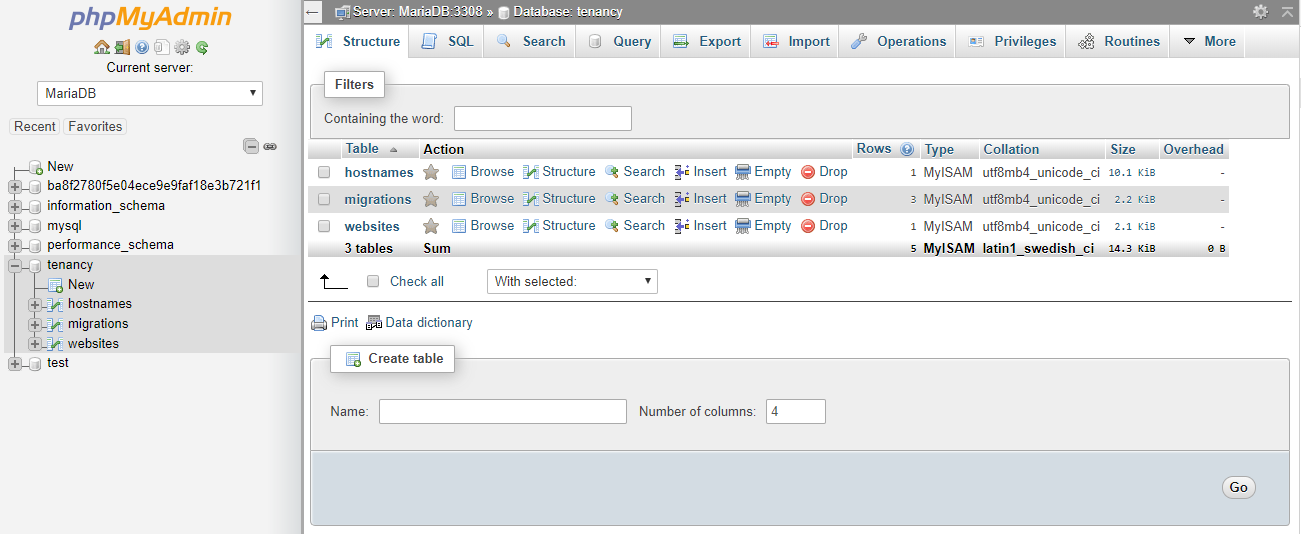
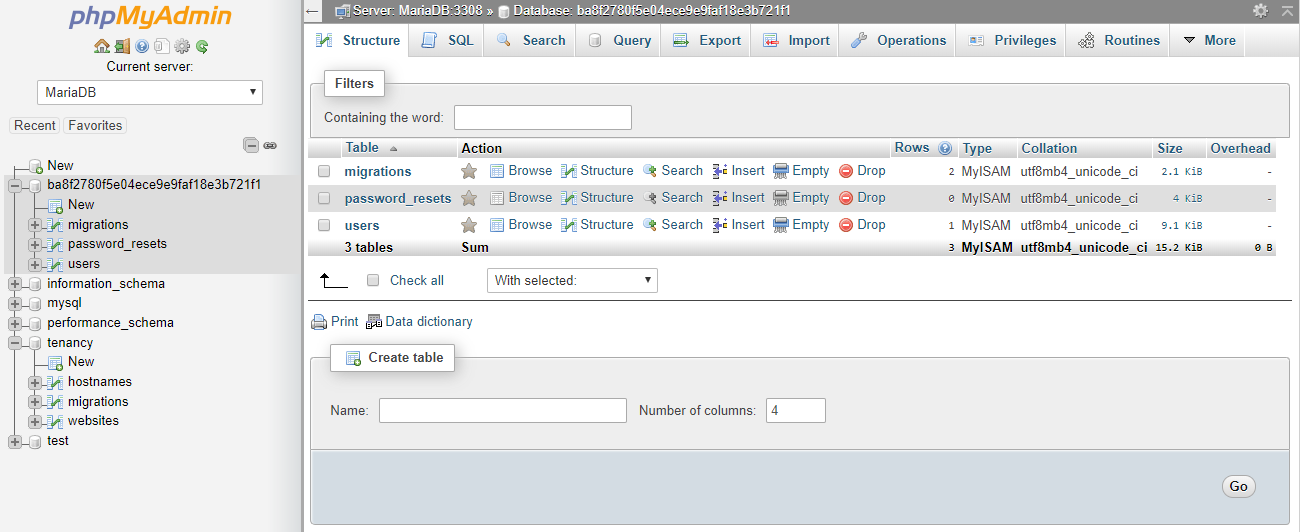
If you open up the database viewer of your choice, you should now see a couple of additions. In the ‘tenancy’ database you initially set up, there are three tables for ‘hostnames’, ‘migrations’ and ‘websites’.
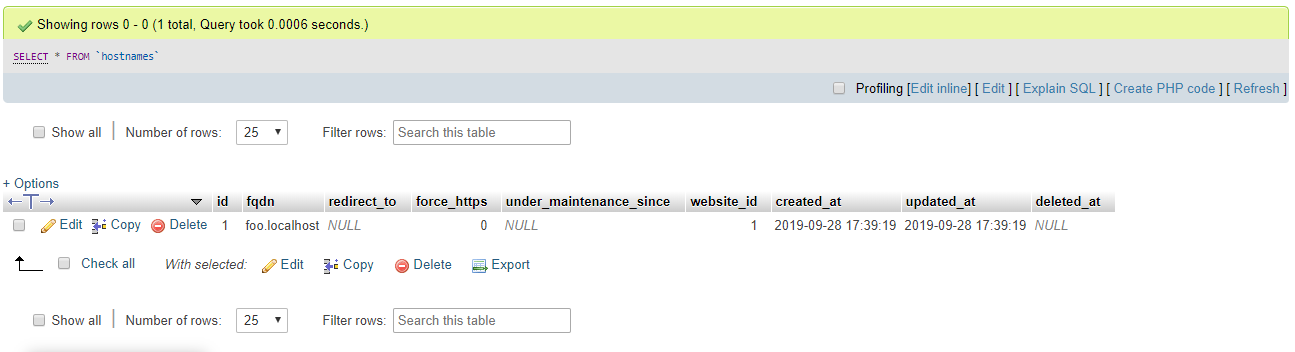
Looking at the hostnames table, our first website/hostname link is set up with the FQDN of foo.localhost.
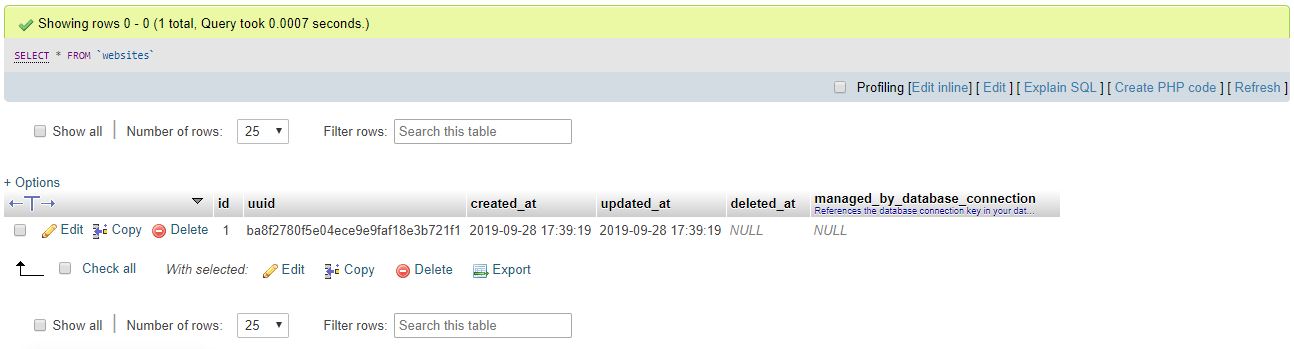
And inspecting our websites table shows a new website with a UUID.
One additional item is the brand new database with a name that matches the UUID. This new database has the initial migrations that are included in the database/migrations/tenant folder. Currently that’s just ‘users’ and ‘password_resets’.
3. Updating Authentication
Right now we haven’t actually added any of the views surrounding Laravel’s logging in and logging out functionality. Fortunately that scaffolding is pretty easy to add. We’re going to run the simple artisan make:auth command and migrate the required tables. For more information, see Laravel’s Authentication documentation.
$ php artisan make:auth

Authentication scaffolding generated successfully.
Alright, now let’s get our application running so that we can test the new login. Start by using the artisan serve command to get a webserver up for testing.
$ php artisan serve4. Logging In
Now Laravel should be running on localhost and be accessible via port 8000. The login routes should have been published to your routes/web.php file and the authentication templates were added to resources/views/auth. Visiting localhost:8000 should now show the default login page.
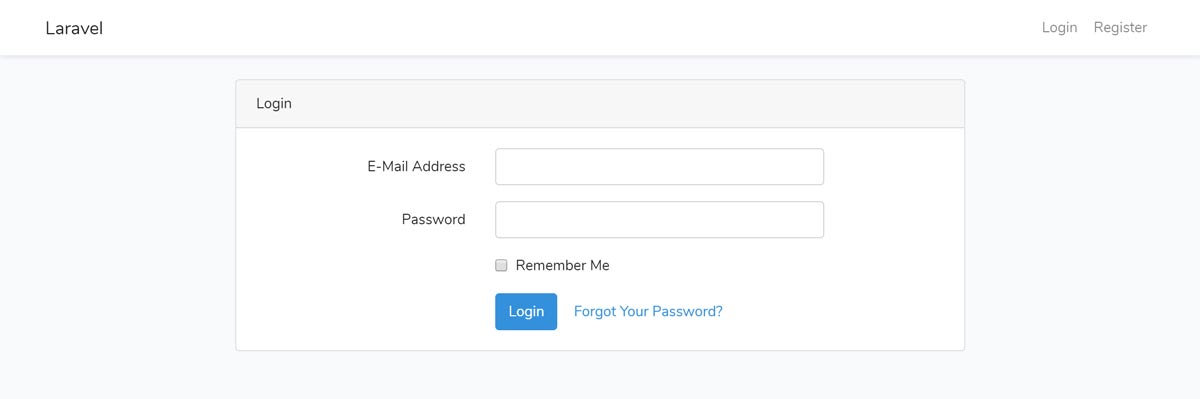
This isn’t exactly what we’re after though, since if you try to log in, you’ll get a SQL error about the Base table or view not being found. It’s looking for a tenancy.users table to authenticate against, which doesn’t exist. To update the application to work with the separate subdomains we’re setting up, there are a few additional steps.
Let’s create some middleware to take care of finding the correct database to use for each subdomain.
$ php artisan make:middleware EnforceTenancy

Middleware created successfully.
Under app/Http/Middleware you should now have a new file named EnforceTenancy.php. Edit this file to automatically apply the tenant database connection.
app/Http/Middleware/EnforceTenancy.php
<?php

namespace App\Http\Middleware;

use Closure;
use Illuminate\Support\Facades\Config;

class EnforceTenancy
{
    /**
     * Handle an incoming request.
     *
     * @param  \Illuminate\Http\Request  $request
     * @param  \Closure  $next
     * @return mixed
     */
    public function handle($request, Closure $next)
    {
        Config::set('database.default', 'tenant');

        return $next($request);
    }
}
And add this new middleware to the $routeMiddleware array in your Kernel.php
app/Http/Kernel.php
    /**
     * The application's route middleware.
     *
     * These middleware may be assigned to groups or used individually.
     *
     * @var array
     */
    protected $routeMiddleware = [
        'auth' => \App\Http\Middleware\Authenticate::class,
        'auth.basic' => \Illuminate\Auth\Middleware\AuthenticateWithBasicAuth::class,
        'bindings' => \Illuminate\Routing\Middleware\SubstituteBindings::class,
        'cache.headers' => \Illuminate\Http\Middleware\SetCacheHeaders::class,
        'can' => \Illuminate\Auth\Middleware\Authorize::class,
        'guest' => \App\Http\Middleware\RedirectIfAuthenticated::class,
        'signed' => \Illuminate\Routing\Middleware\ValidateSignature::class,
        'throttle' => \Illuminate\Routing\Middleware\ThrottleRequests::class,
        'verified' => \Illuminate\Auth\Middleware\EnsureEmailIsVerified::class,
        'tenancy.enforce' => \App\Http\Middleware\EnforceTenancy::class,
    ];
We’re also going to update our User.php to have the ‘UsesTenantConnection’ trait.
app/User.php
<?php

namespace App;

use Illuminate\Notifications\Notifiable;
use Illuminate\Contracts\Auth\MustVerifyEmail;
use Illuminate\Foundation\Auth\User as Authenticatable;
use Hyn\Tenancy\Traits\UsesTenantConnection;

class User extends Authenticatable
{
    use Notifiable, UsesTenantConnection;
Now we need to make these subdomains accessible via a browser. On windows, that entails editing the Hosts file. Add a line for foo.localhost, bar.localhost and app.localhost (for testing later). You’ll need to edit this with notepad or similar with administrative privileges.
C:\Windows\System32\drivers\etc\hosts
127.0.0.1 app.localhost
127.0.0.1 foo.localhost
127.0.0.1 bar.localhost
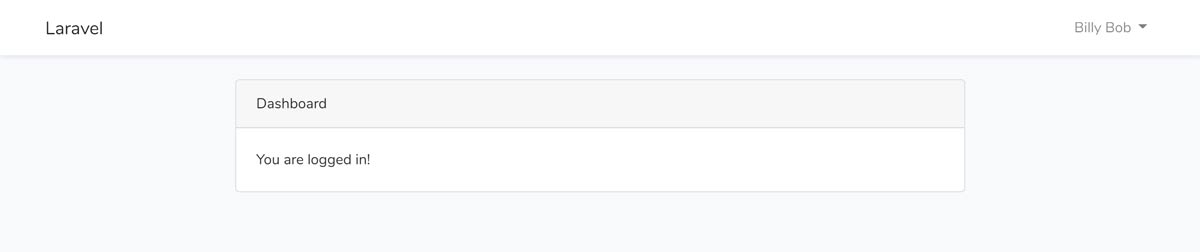
If we open up a browser and visit foo.localhost:8000/login we should now be able to log in with the credentials created earlier.
Edit: Note, there are different ways to enforce the tenancy. You can apply this new middleware to your routes with something like the following:
routes/web.php
<?php

...

Route::middleware('tenancy.enforce')->group(function () {
    [your routes]
});
There’s also a section in the config/tenancy.php file where you can set up a routes/tenants.php file to separate these. In addition, in config/tenancy.php you can force modals to use specific connections instead of using the UsesTenantConnection trait. Test your implementation to find which method works the best for you. In Part 3, we’ll be adding a ‘tenant.exists’ middleware to our routes that encompasses all of our login routes and the Tenancy package will be auto detecting the hostname for our /home routes.
5. Disable Default Logins
So far this is working great! … with one exception. If you visit localhost:8000/login you will still see the login form, but attempting to log in here will blow up. That’s because there is no actual login for the default domain. Let’s fix that by disabling every page on the root domain except for the registration routes and the welcome page. Open up your web.php file and modify it to match what’s below.
routes/web.php
<?php

/*
|--------------------------------------------------------------------------
| Web Routes
|--------------------------------------------------------------------------
|
| Here is where you can register web routes for your application. These
| routes are loaded by the RouteServiceProvider within a group which
| contains the "web" middleware group. Now create something great!
|
*/

Route::domain('localhost')->group(function () {

    // Landing Page Routes
    Route::get('/', function () {
        return view('welcome');
    });

    // Registration Routes...
    Route::get('register', 'Auth\RegisterController@showRegistrationForm')->name('register');
    Route::post('register', 'Auth\RegisterController@register');

    // Catch All Route
    Route::any('{any}', function () {
        abort(404);
    })->where('any', '.*');

});

// Not logged in
Route::get('/', function () {
    return view('welcome');
});

// Authentication Routes
Auth::routes();

// Logged in
Route::get('/home', 'HomeController@index')->name('home');
Now if you visit localhost, you should see the default Laravel screen. If you visit localhost/login, you’ll get a 404 page, and if you if you visit localhost/register, you’ll see the registration form. There’s some additional work to be done here in order to make that registration work and to remove the Login link from the default templates, but we’ll get to that in the next article.
I hope you enjoyed! In the next article we’ll get into a little bit of user management and start laying more groundwork for accepting payments to use our amazing new application.
Additional Resources:
