
This article is a continuation of Creating a Laravel SaaS Framework.
Integrating Stripe with our multi-tenant Laravel setup to accept subscription payments
In part 6 of the the series, I’ll focus on finally adding in Stripe so that we can start taking some test payments for the subscriptions that we’ll set up.
Creating Stripe Plans
At this point we’ve run through the setup of cashier in part 5 which integrates it with a new Website model instead of the default User. Now we need to create a way for new users to select a plan and add their credit card information when they sign up for our application.
To start of, there’s a little bit of planning involved. You’ll need to figure out what subscription levels you’d like, and what they should cost your user. Once you’ve determined that, head over to your Stripe dashboard and add some new plans. When you’re in your Stripe dashboard, make sure to select the “Viewing test data” switch, then select Billing → Products. I’ll create two products here called “Just Swell” at a price of $10.00/mo and “Amazing” at $11.00/mo. We’ll see how many people pony up that last dollar. It’ll be worth it I swear!


Now that we have our two plans set up, we’ll need to grab the plan ID of each to use in our code. Make sure to grab the ID that starts with plan_ and NOT prod_ since we’ll be creating and selling a subscription and not selling an individual product.


Copy those down somewhere and now we’ll work on incorporating them into the registration process.
Adding Payments to The Registration Form
In order to register for our amazing new multi-tenant application, we’ll want to accept payments. To make that as simple as possible, we’ll be adding it directly to the registration form so that the new user can register, pick their plan and pay for the plan all in one fell swoop.
Consult the Laravel Cashier documentation here. They have some excellent examples.
Modify the register blade and add in all of the new fields. We’ll also separate it out a bit in order to have an “Account”, “Plan” and “Payment” section for the form. Right after the password confirmation form group, we’ll add in all of the form components.
resources\views\auth\register.blade.php
                        ...

                        <hr class="separator mt-5 mb-4">

                        <div class="row">
                            <div class="col-md-6 offset-md-4 mb-3">
                                <h4>Choose a Plan</h4>
                            </div>
                        </div>

                        <div class="form-group row">
                            <div class="col-md-6 offset-md-4 mb-3">
                                <div class="radio">
                                    <label><input type="radio" name="product" value="swell" checked>Just Swell @ $10.00/mo</label>
                                </div>
                                <div class="radio">
                                    <label><input type="radio" name="product" value="amazing">Amazing @ $11.00/mo</label>
                                </div>
                            </div>
                        </div>

                        <hr class="separator mt-3 mb-4">

                        <div class="row">
                            <div class="col-md-6 offset-md-4 mb-3">
                                <h4>Payment Info</h4>
                            </div>
                        </div>

                        <div class="form-group row">
                            <label for="card-holder-name" class="col-md-4 col-form-label text-md-right">{{ __('Name on Card') }}</label>

                            <div class="col-md-6">
                                <input id="card-holder-name" type="text" class="form-control @error('card-holder-name') is-invalid @enderror" name="card-holder-name" value="{{ old('card-holder-name') }}" required autocomplete="card-holder-name">

                                @error('card-holder-name')
                                    <span class="invalid-feedback" role="alert">
                                        <strong>{{ $message }}</strong>
                                    </span>
                                @enderror
                            </div>
                        </div>

                        <div class="form-group row">
                            <label for="cardnumber" class="col-md-4 col-form-label text-md-right">{{ __('Credit or Debit') }}</label>
                            <div class="col-md-6">
                                <div id="card-element">
                                    <!-- A Stripe Element will be inserted here. -->
                                </div>

                                <!-- Used to display form errors. -->
                                <div id="card-errors" role="alert"></div>
                            </div>
                        </div>

                        <hr class="separator mt-5 mb-3">

                        <div class="form-group row mb-0">
                            <div class="col-md-6 offset-md-4">
                                <button type="submit" id="card-button" class="btn btn-primary" data-secret="{{ $intent->client_secret }}">
                                    {{ __('Register') }}
                                </button>
                            </div>
                        </div>

                        ...
Note that at this point we’re not putting our plan IDs in the form. Instead we’ll have front-end identifiers that match up with our IDs in the controller. We’re also going a step beyond the Cashier docs by adding in an input for “card-holder-name”. We’ll use that later when we set up the subscription.
With the form elements set up, directly under the </form> closing tag, add in all of the JavaScript we’ll need in order to interface with Stripe and submit our form.
resources\views\auth\register.blade.php
                    ...

                    <script src="https://js.stripe.com/v3/"></script>

                    <script>
                        const form = document.getElementById( 'registration-form' );
                        const stripe = Stripe('{{ config('services.stripe.key') }}');
                        const elements = stripe.elements();
                        const cardElement = elements.create('card');
                        const cardHolderName = document.getElementById('card-holder-name');
                        const cardButton = document.getElementById('card-button');
                        const clientSecret = cardButton.dataset.secret;

                        cardElement.mount('#card-element');

                        form.addEventListener( 'submit', (e) => {
                            e.preventDefault();
                        });

                        cardButton.addEventListener( 'click', async (e) => {
                            const { setupIntent, error } = await stripe.handleCardSetup(
                                clientSecret, cardElement, {
                                    payment_method_data: {
                                        billing_details: { name: cardHolderName.value }
                                    }
                                }
                            );

                            if (error) {
                                // Display "error.message" to the user...
                            } else {
                                // The card has been verified successfully...
                                handleStripePayment( setupIntent );
                            }
                        });

                        let handleStripePayment = setupIntent => {

                            let paymentInput = document.createElement( 'input' );
                            paymentInput.setAttribute( 'name', 'stripePaymentMethod' );
                            paymentInput.setAttribute( 'type', 'hidden' );
                            paymentInput.setAttribute( 'value', setupIntent.payment_method );
                            form.appendChild( paymentInput );

                            form.submit();
                        }
                    </script>

                    ...
We’ll also need to add in a form ID, and while we’re there, add in the new header for the top section. This is near the top of the file.
resources\views\auth\register.blade.php
                ...

                <div class="card-body">
                    <form id="registration-form" method="POST" action="{{ route('register') }}">
                        @csrf

                        <div class="row">
                            <div class="col-md-6 offset-md-4 mb-3">
                                <h4>Account Info</h4>
                            </div>
                        </div>

                ...
So, what’s going on with the JavaScript here? First, we’re loading in the Stripe library and defining their Elements object. That will display the credit card form on the page, which is secure and doesn’t run any credit card information through your server. It’s a direct connection between Stripe and the user’s browser. The “data-secret” attached to the submit button is a Setup Intent which is provided by Cashier (we’ll get to that) and tells Stripe that we’re in the process of setting up a new customer.
On submitting the form, we’ll use the stripe.handleCardSetup() function to securely communicate with Stripe, sending the credit card information and receiving a token back. I’ve skipped adding any error messages for now, but you could add in error messages if you’d like. If the SetupIntent was successful, our handleStripePayment() function adds in the hidden field with the Payment Method and submits our form over to our register route.
Make sense? Cool.
Style the Stripe Element
There are all sorts of options to style the Stripe Element form, but for the purposes of this walk-through, we’ll just add in styles to match the basic Laravel forms that come with the installation. Stripe adds in some of it’s own classes that can be styled, so we’ll add those to our app.scss file.
resources\sass\app.scss
  ...

 .StripeElement {
    display: block;
    width: 100%;
    height: calc(1.6em + 0.75rem + 2px);
    padding: 0.6rem 0.75rem 0;
    font-size: 0.9rem;
    font-weight: 400;
    line-height: 1.6;
    color: #495057;
    background-color: #fff;
    background-clip: padding-box;
    border: 1px solid #ced4da;
    border-radius: 0.25rem;
    -webkit-transition: border-color 0.15s ease-in-out, box-shadow 0.15s ease-in-out;
    transition: border-color 0.15s ease-in-out, box-shadow 0.15s ease-in-out;
  }

  .StripeElement--focus {
	color: #495057;
    background-color: #fff;
    border-color: #a1cbef;
    outline: 0;
    box-shadow: 0 0 0 0.2rem rgba(52, 144, 220, 0.25);
  }

  .StripeElement--invalid {
	border-color: #e3342f;
	padding-right: calc(1.6em + 0.75rem);
	background-image: url("data:image/svg+xml,%3csvg xmlns='http://www.w3.org/2000/svg' fill='%23e3342f' viewBox='-2 -2 7 7'%3e%3cpath stroke='%23e3342f' d='M0 0l3 3m0-3L0 3'/%3e%3ccircle r='.5'/%3e%3ccircle cx='3' r='.5'/%3e%3ccircle cy='3' r='.5'/%3e%3ccircle cx='3' cy='3' r='.5'/%3e%3c/svg%3E");
	background-repeat: no-repeat;
	background-position: center right calc(0.4em + 0.1875rem);
	background-size: calc(0.8em + 0.375rem) calc(0.8em + 0.375rem);
  }

  .StripeElement--webkit-autofill {
	background-color: #fefde5 !important;
  }
Now let’s build that CSS.
$ npm run devNote.. if you’re running the default install still with Vue loaded in and attached to the #app element, it’s not going to like us adding in the <script> tags right into the template. For our purposes, we’ll just remove Vue in the app.js file. Vue is pretty awesome however, so consider refactoring in order to support it in your own app.
The resulting form should now look like the screenshot below.
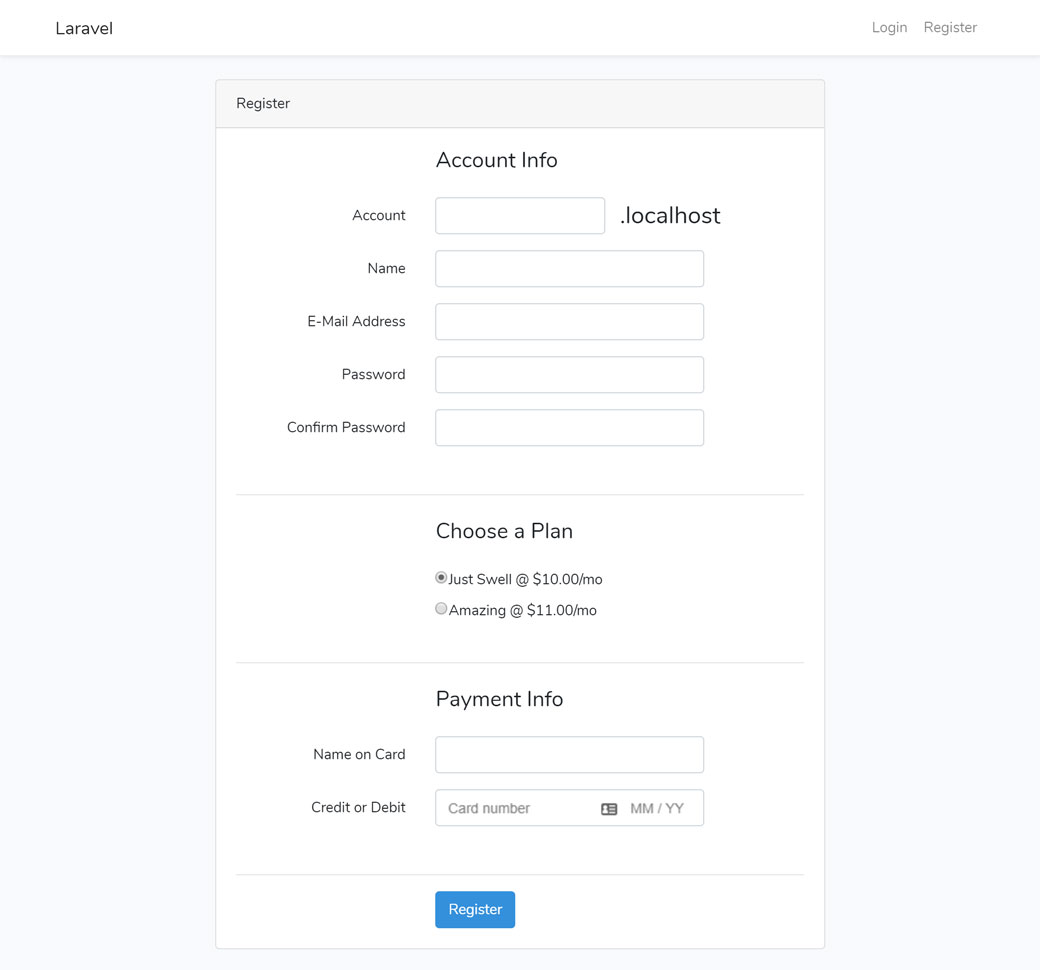
The Register Controller
Our view is complete, so now we’ll need to do something with that data. Let’s work on the Register controller and add in a few things to create the initial SetupIntent, receive the Payment Method from the form and set up a new subscription with Stripe.
For the SetupIntent, Cashier has that taken care of for you. First we’ll need to swap out the Website model that we created in Part 5 and include our own showRegistrationForm() method with the new Intent. This will supply our view with the SetupIntent to include on the button.
app\Http\Controllers\Auth\RegisterController.php
...

//use Hyn\Tenancy\Models\Website;
use App\Website;

...

    /**
     * Show the application registration form.
     *
     * @return \Illuminate\Http\Response
     */
    public function showRegistrationForm()
    {
        $website = new Website;
        return view('auth.register', [
            'intent' => $website->createSetupIntent()
        ]);
    }

    ...
Now we’ll update our validation. We only want our chosen plan identifiers to be valid. Add in the $validPlans variable and the new ‘product’ validation as well as the ‘stripePaymentMethod’, which is that hidden input that we attached after getting a successful response from Stripe.
app\Http\Controllers\Auth\RegisterController.php
    protected function validator(array $data)
    {
        $invalidSubdomains = config('app.invalid_subdomains');
        $validPlans = [ 'swell', 'amazing' ];

        return Validator::make($data, [
            'account' => [
                'required',
                'string',
                Rule::notIn( $invalidSubdomains ),
                'regex:/^[A-Za-z0-9](?:[A-Za-z0-9\-]{0,61}[A-Za-z0-9])$/'
            ],
            'fqdn' => ['required', 'string', 'unique:hostnames'],
            'name' => ['required', 'string', 'max:255'],
            'email' => ['required', 'string', 'email', 'max:255'],
            'password' => ['required', 'string', 'min:8', 'confirmed'],
            'product' => ['required', Rule::in( $validPlans )],
            'stripePaymentMethod' => ['required', 'string'],
        ]);
    }
Lastly, we now need to create the subscription at the same time that we’re creating the new user and subdomain. Modify the create() function with not just the fqdn, but also product, stripePaymentMethod and email. This is also where those plan IDs from Stripe will be used, so make sure to update the $plans array with your own plans and identifiers.
app\Http\Controllers\Auth\RegisterController.php
    ...

    /**
     * Create a new user instance after a valid registration.
     *
     * @param  array  $data
     * @return \App\User
     */
    protected function create(array $data)
    {

        // Use the Tenancy package command to create the tenant
        $hostname = $this->createTenant(
            $data['fqdn'],
            $data['product'],
            $data['stripePaymentMethod'],
            $data['email']
        );

        // swap the environment over to the hostname
        app( Environment::class )->hostname( $hostname );

        $user = User::create([
            'name' => $data['name'],
            'email' => $data['email'],
            'password' => Hash::make($data['password']),
        ]);
    }

    private function createTenant( $fqdn, $product, $paymentMethod, $email )
    {
        // first create the 'website'
        $website = new Website;
        app( WebsiteRepository::class )->create( $website );

        // now associate the 'website' with a hostname
        $hostname = new Hostname;
        $hostname->fqdn = $fqdn;
        app( HostnameRepository::class )->attach( $hostname, $website );

        // it's important to choose the plan_ ID, not prod_ ID
        $plans = [
            'swell' => 'plan_OPqrSTuVwxYZ',
            'amazing' => 'plan_AbCdEfGHIjkLMN'
        ];

        // create the subscription
        $website->newSubscription( $product, $plans[$product] )->create( $paymentMethod, [
            'email' => $email
        ]);

        return $hostname;
    }

    ...
Once you save those changes, you should be able to now sign up new customers with Stripe! Great job! If you missed any of the setup steps, make sure you head back to Step 5 of the SaaS series to make sure you have everything else in place.
Once you run a few tests, you should be able to see the new subscriptions in your Stripe dashboard. Click the View test data toggle and head to Billing → Subscriptions. Make sure to use Stripe’s testing numbers when creating new tenants.
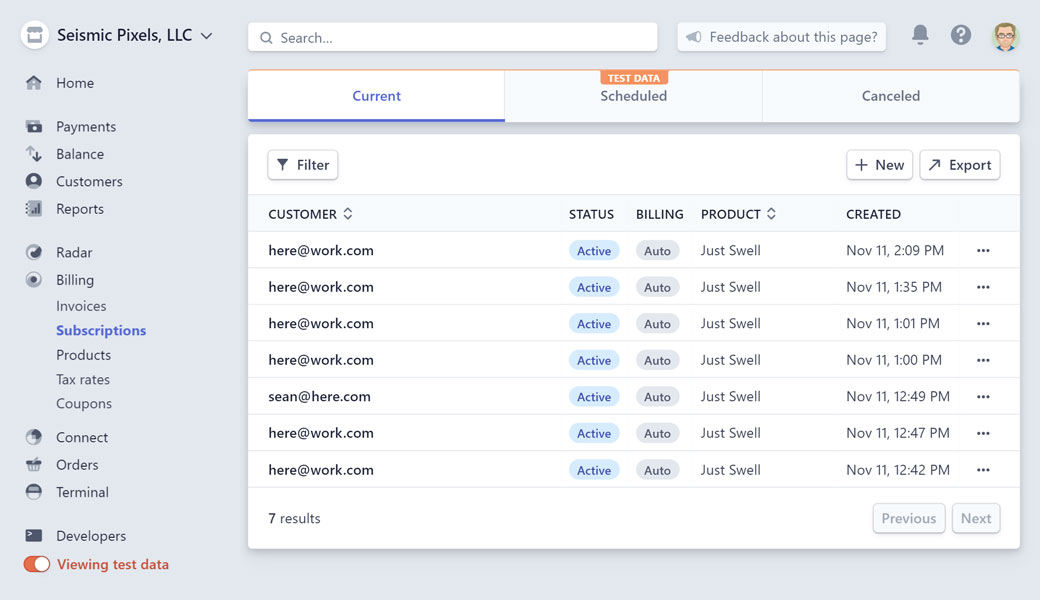
Notice in the screenshot above that the testing emails are all the same. That’s because our application is not tied to a unique email, but to a website instead. So theoretically, if the customer wanted to start “Just Swell” subscriptions for foo.localhost, bar.localhost, etc.localhost they could set up and pay for each.
Taking One More Step
Just so that we can integrate Cashier a little more, let’s add some information to the user’s home screen so they can see their subscription information. Eventually you’ll want to add this to an account screen instead.
Modify the Home controller. In the index() method that displays the user’s home page we’ll include their invoices. We will also add a function to allow the user to download individual invoices. Make sure to include our Website model.
app\Http\Controllers\HomeController.php
...

use App\Website;

    ...

    public function index()
    {
        $website = app(\Hyn\Tenancy\Environment::class)->tenant();
        $invoices = $website->invoicesIncludingPending();

        return view('home')->with( ['invoices' => $invoices ] );
    }

    public function invoice( Request $request, $invoiceId )
    {
        $website = app(\Hyn\Tenancy\Environment::class)->tenant();
        return $website->downloadInvoice($invoiceId, [
            'vendor' => 'Your Company',
            'product' => 'Your Product',
        ]);
    }

    ...
Now modify the home blade to include the invoices table.
resources\views\home.blade.php
@extends('layouts.app')

@section('content')
<div class="container">
    <div class="row justify-content-center">
        <div class="col-md-8">
            <div class="card">
                <div class="card-header">Dashboard</div>

                <div class="card-body">
                    @if (session('status'))
                        <div class="alert alert-success" role="alert">
                            {{ session('status') }}
                        </div>
                    @endif

                    You are logged in!
                </div>

            </div>
        </div>
    </div>

    <div class="row justify-content-center mt-4">
        <div class="col-md-8">
            <div class="card">
                <div class="card-header">Invoices</div>

                <div class="card-body">
                    <table>
                    @foreach ($invoices as $invoice)
                        <tr>
                            <td>{{ $invoice->date()->toFormattedDateString() }}</td>
                            <td>{{ $invoice->total() }}</td>
                            <td><a href="/invoice/{{ $invoice->id }}">Download</a></td>
                        </tr>
                    @endforeach
                    </table>
                </div>

            </div>
        </div>
    </div>
</div>
@endsection
And finally, we’ll need that invoice route. Add a new route at the end of your web.php file, right after the /home route.
routes\web.php
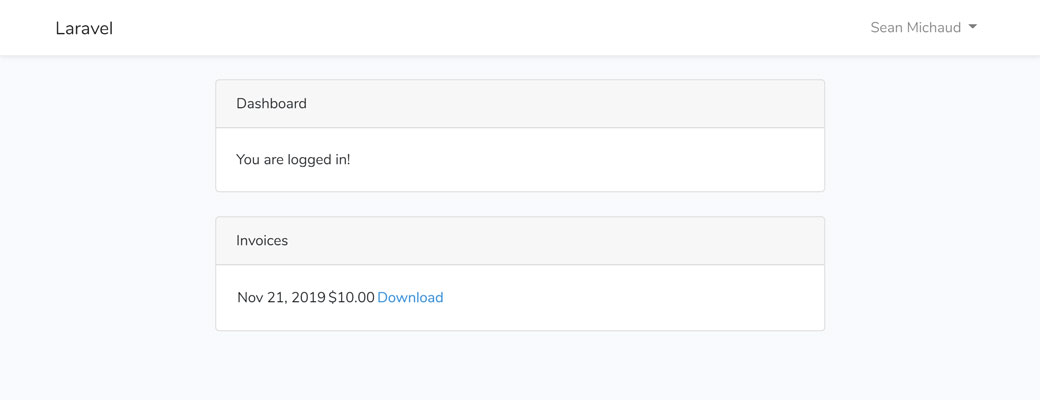
Route::get('invoice/{invoice}', 'HomeController@invoice');Now our user’s home page has invoices and the ability to download.
Wrap Up
That’s it for this section. Stay tuned for additional updates and thanks for reading!